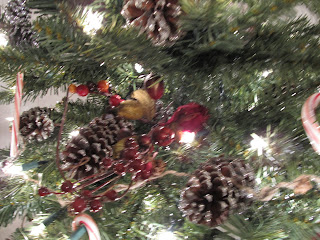

I hope you are enjoying this Christmas Season! I have done a few fun projects. One of the first of the season was coming up with decorations for our tree. Mark helped me. We put our elf hats on, went outside and gathers our materials then sat outside and got creative! We moved at the end of the summer and we have not unpacked much since we don't know when or where we might go from here. So instead of finding our Christmas decorations we went with a semi-natural decor. We gathered lots of pine cones and glittered them unmercifully! It was fun! I had some picks of roses and greenery and stuck them in the tree then we put the glittered pine cones on the tree. We wanted some garland so we found tiny pine cones added glitter again, then strung them on jute. I made stars out of vines and jute and put them on the tree, too. Hank added the candy canes, of course!!! It turned out nicely. The glitter catches the light and is very pretty. I took a couple of pictures but it does not do it justice. You will just have to come over and take a look!!!!
Have you seen the coasters on Pinterest? I got some for Christmas last year from Lindsey. They have our initial on them. We have enjoyed using them. But you know I am all about Christmas.....so I found some cute tissue paper and made snowman coasters!!! I know I will be making more of these in the future because they are so stinkin' cute and easy and who doesn't need a set of coasters??!!!!
Supplies: tile, tissue paper or napkin with design of your liking, Mod Podge, felt tabs for the bottom side, sand paper, and sponge brush. Cut designed paper to fit the tile. Put a layer of Mod Podge on top of tile then place paper on top and smooth out any creases. Add another layer of Mod Podge and allow to dry. Sand edges to even and another coat of Mod Podge. Allow to completely dry and add felt tabs to bottom side of tile.
I have a favorite craft I enjoy doing and I seem to always find some thing to decorate using the glass etching. I have etched on mugs, plates, trifle bowls, and now this canister! I love this canister because you can use it for so many reasons and occasions. I have used mine as a punch bowl, candle holder, cookies, vase....I really make good use of this canister. Guess what my daughters are getting for Christmas! Don't tell them!
I have also been busy in the kitchen. Have you made the Oreo Truffles? Oh my, to die for!
Recipe: Put one bag of Oreos in the blender and run until powdery. Add one block of softened cream cheese (8 oz), and 1 tsp. vanilla extract. Continue to blend until well mixed. Roll into balls and dip into melted bark. We have dipped them in white and dark - either are delicious.
A favorite of Mark's is the pretzel rods with chocolate. Dip the ends of the pretzel rod in chocolate. You can add any kind of sprinkles or other yummy things like crushed nuts, crushed peppermint, coconut, brickle - do what you love!
Hope these ideas inspire you to have some Christmas creative fun! I have a few other things I hope to share with you in the next couple of days!!! In the meantime, Merry Christmas to you and your family.


Look at you!! Love your tree!! And the coasters! Oh and the canisters!! You're super talented!! AND you need to post this link on FB so I know when you post so I can read it!!
ReplyDelete